Making your Fiesta ST Handle Even Better

The Fiesta ST (FiST) is an excellent handling car. Not very often do you have front wheel drive (FWD) cars handle as well as the Focus and Fiesta STs. There are several things that make the Fiesta stand out in spite of it having quite a conventional and simple suspension layout (with a solid rear axle!).Fiesta ST Stratified AutoX

One of the advantages the FiST has over the competition is its light weight. There is little that can make as much of a difference as shedding weight. The reason for this is that changes in direction (changes in momentum) require a lot less energy. This in turn translates in less energy lost between the tire contact patch and pavement, less energy lost in compressing the suspension, flexing the chassis, etc. The second great thing about the FiST is the way the suspension was setup from the factory. It is a stiff suspension for a production car; but this is what us enthusiasts crave. Finally, let’s not discount Ford’s torque vectoring. This little trick allows the chassis ECU to independently apply the brakes to any wheel in order to make the car rotate and apply power more effectively in corners. This is something used in the Focus ST and RS as well. All of this adds up to a car that is very happy to handle the turns and that means fast lap times!

Is there a way to improve on this already great recipe? With some careful planning there is! What you want to avoid is to take away some of the rotation happy characteristics of the car. That means that I recommend leaving the sway bars alone initially; especially on a car this light. Instead focus on grip (tires, alignment) damping (shocks) spring rate (springs), and brakes.

Coming to the shocks and springs discussion; I always recommend upgrading to something with the best shocks. Springs are simple compared to the shocks and the ride quality as well as handling bumps and corners almost always comes down to the shocks. A personal favourite is Bilstein for me. They have a reputation for making great shocks and whether you get a B8 shock + spring combo or one of their coilovers you’re in for a treat both on the street and track. We recently installed a set of B14 Coilovers on our 2015 Fiesta ST and they have been great. We have these same coilovers on our 2014 Focus ST as well. Very affordable combined with great performance makes the B14 a go-to option when upgrading the suspension. From our experience – here are a few install tips for the Fiesta ST:Fiesta ST Bilstein Front Built Stratified
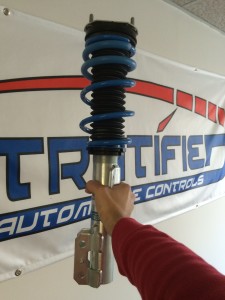
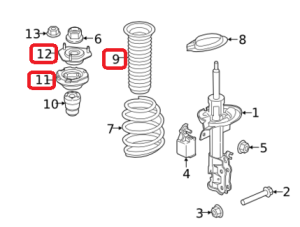
  • Purchase the top hats (PN C1BZ3A197D), front strut bearings (PN 8V5Z18198A), and dust boots (PN 8V5Z18A047A) (these act as a spring insulator as well) from the dealer before embarking on the job. You will need two of each. They are affordable, make the assembly of the front suspension a breeze without needing a spring compressor, and they are wear items that should be replaced when upgrading the suspension. Fiesta ST suspension
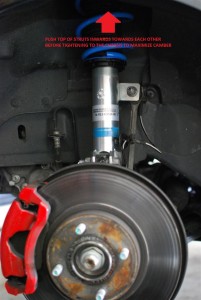
  • When installing the front suspension, push the front strut assembly at the strut tower towards the inside of the car before tightening it down. This will give you the most camber you can get without camber plates. Camber is a good thing.Fiesta ST Bilstein Front Stratified
  • When installing the rear shocks, before bolting them to the chassis apply some grease to the top of the bushing (you will reuse the OEM one) and clean the chassis and mounts. If you don’t do this you will hear squeaking from the rear suspension when driving.
  • When setting up the ride height, allow the car to have a bit of rake and don’t “slam” it for best performance. You want to look at the front control arms and allow them to be relatively flat with the pavement. Fiesta ST Bilstein Installed Stratified
  • Get a professional alignment to set the front toe, make sure the steering wheel is straight so you won’t get poor tire wear. Fiesta ST Bilstein Stratified Alignment
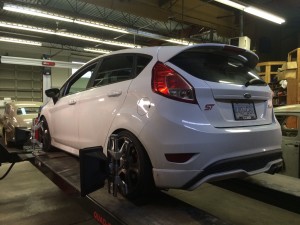
After this get out there and enjoy the car. The ride will be a little stiffer but should feel compliant and not jarring. You will notice less brake dive and less body roll. The car should have very good turn in and still be very very happy to rotate. We’ve taken the car to autocross with just this suspension change (and our COBB AP and Tune) and it proved to be one of the fastest cars there … even putting a few expensive German sports car to shame.Fiesta ST Bilstein Installed Stratified Autocorss

It should be mentioned that this Fiesta has a few other modifications installed and these give it more pull out of corners with excellent throttle modulation and control and a nice induction sound.

For tires, there are lots to choose from out there. Because the car is so light you can get away with tires that are a little less extreme than what most use for the same application. The tire wear will also be good, again, because of the light weight. The OEM tires are good and you can work your way up from there. Even for an open track day you can do very well with a set of extreme summer tires such as the Bridgestone RE11/RE71, Dunlop Direzza and others in that category. Those tires would also be great for auto-x as they come up to temperature relatively quickly.

To improve handling further on our particular car, we are looking at tires and brakes next. Engine performance wise, the next steps would be an upgraded intercooler and/or WMI, and some exhaust work. These should maximize the power potential (and sound) of the stock turbo before thinking about upping its size just a bit … Stay Tuned!

Upgrading your Ecoboost Fuel System – Part 1 – How it Works

As the power levels rise for the Ecoboost powered cars, there is a need for additional fuelling over what the OEM system provides. Choosing the correct fuel solution for your needs is important so this 3 part series of articles will walk through how the OEM system works, when you need to upgrade, and finally, what the correct upgrade is for you.

So let’s start with the basics and look at how the OEM Ecoboost fuel system works. As you know, the car uses a direct injection fuel system that pressurizes fuel to above 2000psi (we can and do target higher pressures but as soon as flow drops so does pressure – more on this later) before injecting it directly into the combustion chamber. The fuel system is made up of the following components:

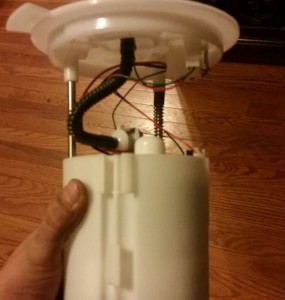
An in-tank returnless transfer pump (LPFP). This pump is electronically controlled via the tune and it can operate at pressures of up to 100psi. On the Focus ST, this in-tank pump can flow up to around 475whp worth of fuel. From all the OEM fuel system components this is the highest flowing component and the last to run out or need an upgrade. It sits inside the tank in an assembly that looks like this:Focus ST Ecoboost Fuel Pump In TankMoving from the tank there are 5/16 fuel lines that travel under the vehicle and up towards the rear of the engine bay. As the lines enter the engine bay there is a low pressure fuel sensor that you can monitor via the COBB Accessport or similar device. This sensor is what the ECU uses to target the desired LPFP fuel pressure and you can use to see the health of your LPFP

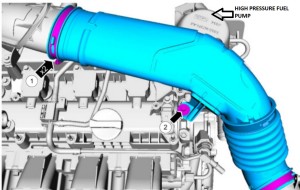
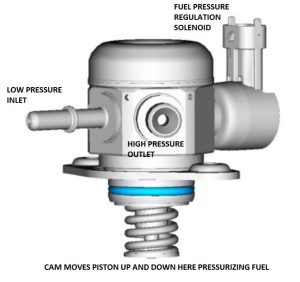
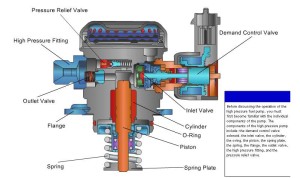
This feed line is then connected to the inlet of the HPFP (high pressure fuel pump). This pump is driven by the exhaust camshaft of the engine. In the 1.6 and 2.0 EB engines the camshaft has 3 lobes. On the 2.3 (Mustang EB, Focus RS) it has 4. So for every single revolution of the camshaft (every two revolutions of the engine) the pump is actuated 3 (or 4 for the 2.3l) times.Focus ST Ecoboost High Pressure Fuel Pump 0

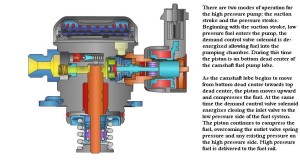
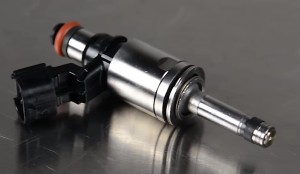
The pressure is controlled electronically via a solenoid inside the pump and via the ECU/tune. But keep in mind that the pressure is also related to the amount of fuel FLOW the pump can deliver. And this is a function of how quickly the pump piston is move up and down, the amount of fuel moved during a single stroke of the piston, and the inlet fuel pressure of the pump. On the EB motors, the HPFP is the first to run out of fuel flow, especially at low engine speeds (because the camshaft is also moving slowly)Focus ST Ecoboost High Pressure Fuel Pump 1Below is more on the fuel pump operation for those interested. Focus ST Ecoboost High Pressure Fuel Pump 2Focus ST Ecoboost High Pressure Fuel Pump 3The high pressure fuel is then delivered to the high pressure fuel injectors and the fuel pressure is measured by a sensor on the fuel rail. These injectors sit on the intake side of the engine. They are the second part that will run out of flow on the various Ecoboost engines. However, they do so AFTER the HPFP and this is a key thing to remember. Without upgrading the HPFP, higher flowing injectors won’t be of help by themselves. Ecoboost Fuel Injectors

So to recap, the OEM fuel system consists of an LPFP in the tank (good for 475whp on the 2.0l), an HPFP driven by the exhaust cam (good for 380 ft lbs of torque and 370whp on the 2.0l) and a set of injectors (good for 380-390whp on the 2.0l). The 1.6l runs out of fuel around 50whp earlier and 2.3 has around 30-40whp extra in hand. Part 2 of the article in the series will go over how to tell if your fuel system is in need of an upgrade and some of the issues that come with direct injection fuelled engines. Part 3 will go over the solutions and how to stay safely fuelled. Stay tuned!

Adjusting and Upgrading your Wastegate Actuator

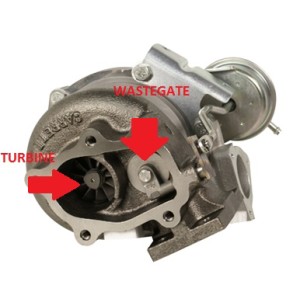
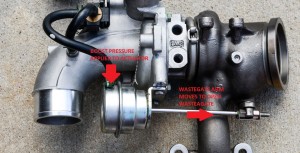
Let’s first go over how the wastegate and actuator work. The purpose of the wastegate is to maintain a particular boost pressure at the intake manifold by regulating the speed at which the turbo spins. It does this by regulating a pathway/door which diverts exhaust gases AROUND the turbine. The faster the turbine spins, the more boost the turbo generates.

Internal Wastegate

The more exhaust you divert through the wastegate (the more you open the wasetgate door), the more you slow the turbo down and this is how you lower boost.


This wastegate is pushed open or held closed by the wastegate actuator and a number of other variables such as exhaust pressure. The actuator is a boost actuated diaphragm inside a canister with a rod sticking out as shown below. Boost pressure is applied to the canister and once the boost is higher than the spring pressure inside the canister, the wastegate actuator rod starts to move and open the wastegate.

Wastegate Actuator How it Works

The actuator doesn’t open the wastegate fully at a given single pressure. It starts to open it at a cracking pressure (also known as spring pressure) and then the more pressure you apply to the canister the more it opens the wastegate door. The amount of boost pressure this canister sees is regulated using the boost control solenoid which is controlled by the ECU and the tune running on the motor.

In spite of the ECU controlling boost pressure going to the actuator, the amount of boost a turbo can hold at any engine speed (RPM) is determined by a large number of factors. Some of these are the turbo itself, the engine displacement, the flow parts installed, the ambient temperature and more importantly for this discussion the spring inside the wastegate actuator and the preload on this spring. On OEM wastegate actuators we can’t change the spring inside the canister because they are sealed. On aftermarket actuators and external wastegates we can change the internal spring. Therefore, the only aspect that we can change on the OEM actuator is preload. Shortening the wastegate rod using the adjustment screws adds preload to the internal spring. The reverse removes preload. When you increase the preload you do two things. One is that you increase the boost pressure needed to start opening the wastegate. The second is that you  lower the opening range of the wastegate door.

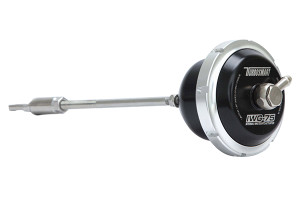
Increasing preload or changing the actuator with a higher spring pressure model (such as a Turbosmart pictured below) results in more boost! And that’s a good thing – right?

turbosmart_internal_wastegate_actuators_universal_fit

Well – the answer is a little more complicated.

First of all, keep in mind that making these kind of changes almost always requires that you get your tune adjusted. Reliable boost control is extremely important for the reliability of the engine. Secondly, you can introduce boost response issues such as boost spiking and boost creep. Most OEM turbos won’t suffer from these issues but it’s very important to make sure the boost of your vehicle reacts smoothly and is under control after you make any changes to the system.

Finally you have to make sure that more boost actually results in more power. When building and tuning a car, you have to look at the engine as a package. Changing boost will affect other variables such as fuel requirements, cooling requirements, and whether or not everything is still working efficiently.

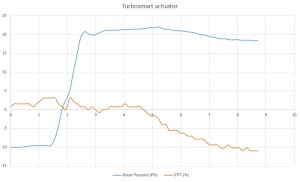
A Turbosmart actuator on a Focus ST with the OEM K03 turbo will hold over 20psi to redline for example. The OEM actuator will only allow 13-15psi. In experimenting with this we found that holding more boost to redline makes the car quite knock prone even when using E85 mixes and mild timing. The turbo looked to be well out of its efficiency range and we kept dropping the boost until we were at 18psi at redline. Even then the motor was knock prone especially up top. Increasing the boost on the OE turbo in the upper RPM (past 6000RPM) is not worth the penalty in heat and timing reduction especially on pump gas.

Another interesting bit of information was that without modifying the fuelling tables the short term fuel trims (STFT) became quite negative in the upper RPM (in orange in the graph below). The car calculates fueling based on boost pressure/manifold pressure and this drop in STFT indicated that for the boost measured the airflow was actually less than the ECU was calculating and expecting.

This is anTS Actuator stock turboother indication of the lack of efficiency of the K03 at those boost levels. The higher we pushed it in terms of boost, the more negative the trims.
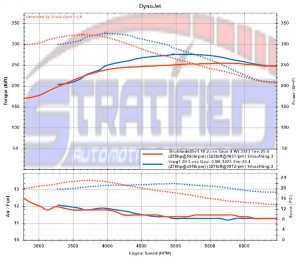


The Virtual Dyno plot below shows a similar story. This was on E85, stock actuator (red) vs Turbosmart (blue). There is a big difference in boost which results in a nice midrange increase in torque. However look at 6000 RPM – there the increase in boost makes no difference in power and we are probably driving the OEM turbo much too hard and reducing reliability. We had to reduce timing by around 6 degrees up top to keep the car from knocking even on 3.5 gallons of E85 mixed in the tank. Things got toasty and inefficient.

TS actuator

Conclusion on this? A little bit of extra boost is going to give you a nice bump in midrange torque. Adjusting the preload on the OEM actuator on the Focus ST carefully can give you a little bit more boost, but don’t overdo it. If you modify the boost control system and are not sure of what to look for make sure you have your tuner look over the data coming from the engine after the change. We offer the datalog report service for situations such as these.

Keep a very close eye on knock/timing corrections. This is especially true on pump gas as more boost (especially past 6000RPM) results in more knock. If you have poor pump fuel this may not be worth the penalty you will take in terms of timing and heat/inefficiency. Finally, driving the OEM turbo (or any turbo) to inefficient boost levels is likely to affects its long term reliability.

Drag Racing the Focus ST

Drag racing is something a lot of the ST community enjoys so here are some of our findings in drag racing the ST.

We didn’t take the car drag racing when it was stock or close to stock. At our local track a stock ST runs in the 14s on street tires. You can take a stock ST and drag race it all day long without worrying about breaking things or being overly hard on the car. Seat time will improve times more than anything. At the same time keep in mind that the low profile tires on the ST are made for cornering and not drag racing. You will get lots of wheel hop and 60 foot times will be high. This doesn’t result in the best overall quarter mile times.

As you increase the power, you will see incremental improvements especially when coupled with seat time and traction! Keeping the stock K03, a car with E85 or WMI and all bolt ons and a good tune is capable of low 13s at around 105-107mph with the right tires. For tires you can either get a drag radial like the Hoosier Drag Radial DOT tire or something even more aggressive like a Quick Time Pro.

The Drag Radials are sized the same as normal street tires. A common size is the P245/45R17 (https://www.hoosiertire.com/specdrag.htm#DOT Drag Radial). These need to be fitted to a set of 17″ rims. I recommend getting the smallest diameter wheel possible (on the later ’14s and ’15s that’s a 17 rim to fit the brakes) Remember that in drag racing the most important part of your run is the launch and 60 foot. This is why people talk about it so much. Whatever you save on your 60 foot will double by the end of the quarter mile. For example if your 60 foot is 2.2 seconds and your quarter mile is 14.0; if you cut that 60 foot to 2.0 seconds your quarter mile time will drop to 13.6.

This is why drag tires are so important. If you have lots of power and can’t put it down, you won’t have an ET that is representative of that power level. Most people on street tires will have a 60 foot of 2.4-2.2 seconds. On drag radials you can consistently be in the 2.0-1.9 range. Your trap speed (if you don’t miss shifts) is representative of your power level.

Name: Drag Radials.jpg Views: 36 Size: 26.7 KB

Jeremy, one of the guys that works for us from Memphis uses drag radials and here is one of his runs. He has a lot of track experience and consistent times. He is running a GTX2867 and 2 gallons of E85 in this run.

For my car, I went with a more aggressive tire – a Hoosier QTP slick (https://www.hoosiertire.com/specdrag.htm#QUICK TIME PRO). The size is 26 x 9.5 x 16. It is a little tall even for 400whp. It hooks up very well and I run 12-14psi of pressure in the tire. Since it is on a 16″ rim there is a lot of sidewall flex meaning it can absorb the impact of a launch quite well and not slip. This tire should be able to get well into the 1.8-1.6 60 foot range depending on how aggressive you launch.

Name: Focus ST Hoosier QTP.png Views: 35 Size: 607.4 KB

When we took the car to the track the first time, it was already on the big turbo (ATP GTX2867), Stratified aux fuel, etc. It was making around 380 ft lbs and 400whp but flat foot shifting was not working as it should have been. With a launch around 4000 RPM, managed a 12.6 second run.

Knowing there is more in it, sorted out some of the FFS issues, increased torque and went back. While the car was making a solid 400 ft lbs+ of torque the clutch was still stock with 23000 miles on it.

Name: 417whp.jpg Views: 34 Size: 152.6 KB

On the first pass at this power level, the clutch finally couldn’t hold the torque.

The shock delivered by the 5000 RPM launch overwhelmed the OEM clutch which is not surprising. Later that day once the car cooled off, the clutch would again hold fine on street tires. So on slicks, at 400+ ft lbs of torque launching can overwhelm the clutch. Otherwise and so far everything has been holding together great. We have an upgraded COBB rear motor mount as well as Bilstein B14 coilovers installed which help keep the car and engine planted while still being very civil in daily driving.

What’s next? A Spec Stg3+ clutch (sticking with the OEM dual mass flywheel) and a Quaife LSD (this is more so for auto-x). The engine has been very reliable so far even with the abuse of R&D as well as daily driving the car which is great to see. While the ST is better suited for going around turns, you can certainly have a lot of fun with it at the drag strip. So get out there and race your ST, you won’t regret it!

How to run over 29 PSI on the EcoBoost Focus ST

TL; DR – if you want to run more than 28-29psi of boost you will need to upgrade your MAP sensors with this kit:
Guardian Angel V2 Overboost Protection and 4 Bar MAP Sensor [GUARDIAN_ANGEL_V2] – $215.00USD : Stratified Automotive Controls

Name: Stratified GuardianAngel V2.png Views: 107 Size: 302.6 KB

Now on to the details:

The 4 cylinder Ecoboost calculates fuelling, timing, engine load … all the important parameters needed to correctly and safely run the engine by measuring the pressure in the charge air system at two distinct points using two MAP (manifold absolute pressure) sensors.

1. At the manifold itself.

Name: Focus MAP Sensor 1.JPG Views: 106 Size: 394.0 KB

2. At the outlet of the intercooler. This sensor measures both pressure (TIP) and charge air temperature (CAT).

Name: Focus MAP sensor 2.JPG Views: 105 Size: 423.5 KB

Both of these sensors are capable of reading 3 bar of absolute pressure. This translates to around 29psi of boost at sea level. In order to tune above this boost level, you must allow the ECU to read higher pressures. This requires upgrading both of these sensors with units that read higher. We have devised a solution to upgrade these sensors (a requirement for moving above 29psi safely) that is easy to install and offers several other benefits.

1. At the manifold, we use the Guardian Angel with a MAP sensor output. The Guardian Angel has an integrated 4 bar MAP sensor (measures up to 44psi of boost). Since the GA is always monitoring your boost anyway, we bring out this signal, and attach it to the wire going to the ECU. This is very easy to install (cut and splice 1 wire) and on top of it you have the key benefits of the Guardian Angel:

– Overboost protection
– Blow off/bypass valve control that is tunable and prevents the surge you see with the OEM BPV solenoid
– External input for a WMI failsafe

2. At the intercooler, we replace the MAP sensor with a genuine Bosch unit that plugs right in. You have an option of a 3.5 bar (up to 37psi of boost) or 4 bar (44psi of boost). The 4 bar is quite a bit more expensive so only get it if you need it. This secondary sensor (3.5 and 4 bar) can be purchased as an option when you get the GA.

Name: Focus MAP sensor 3.5 bar.JPG Views: 102 Size: 323.8 KB

Aside from this you need to adjust the tune for these (or we cand do it for you) (the COBB Accessport has all the tools to do this) and you will need a symposer delete to give the Guardian Angel the manifold pressure signal. We have tested the components and kit and offer it for those that are looking at pushing the boost higher and higher on the platform.

Guardian Angel V2 Overboost Protection and 4 Bar MAP Sensor [GUARDIAN_ANGEL_V2] – $215.00USD : Stratified Automotive Controls